> For the complete documentation index, see [llms.txt](https://docs.podplay.app/llms.txt). Markdown versions of documentation pages are available by appending `.md` to page URLs; this page is available as [Markdown](https://docs.podplay.app/events/sign-up-for-an-event.md).
# Event Sign-up & Attendees
### Overview
Customers browse all currently active Events in the **Programs/Community** tab of the App. They can filter by Event type using Quick Filters or Advanced Filters, then tap into any Event with open spots to sign up.
If an Event is full, Customers can join the Waitlist instead.
#### When a Customer can sign up
A Customer can sign up for an Event any time there is an open spot and they have visibility of the Event. This includes signing up shortly before the Event starts — as long as a spot is available.
### FOMO feature
The FOMO feature makes Member-only Events visible to Non-members with a countdown showing when they can sign up. Non-members see the Event but cannot join until their signup date arrives, and they also see a prompt to purchase a Membership.
To enable FOMO:
1. Create an Event and complete all required fields.
2. Find the **Signup Opening** section above the Cancellation window.
3. Set separate signup dates for Members and Non-members.
4. To set different dates per Membership type, use the **By membership** override section.
Once active, Members with access can sign up immediately. Non-members see a countdown timer and a Membership signup prompt.
If the Event is Members-only, Non-members see only the Membership signup prompt.
#### Why some Events show spots remaining and others don't
Whether Customers see how many spots remain depends on your Club's area and per-Event settings.
When **Show Spots Left** is enabled:
* Event cards show a blue tag with how many spots remain when fewer than 10 spots are left
* The Event detail page always shows the spot count in the **Sign Ups** section
When **Show Spots Left** is disabled for an Event, Customers do not see a spot count.
### Booking Horizon
The Booking Horizon normally limits how many days out a Customer can book a Reservation. It does not limit Events. When an Event is published as `Listed in app`, every Customer can see it, Member and Non-member alike.
Events publish at 12 pm, noon, local time to the Club's location. If a Member has a 14 day Booking Horizon, they see the 14th day in the future at 12 pm, noon, today. Reservations behave differently. The last day of a Booking Horizon for a Reservation becomes available at 12 am, midnight.
{% hint style="info" %}
Use the Schedule feature to publish an Event without making it immediately visible to Customers. Schedule lets you show the Event to Members before Non-members, or to both at the same time. This is not the same as a Members-only Event. See the article "Can I create a Members-only Event?" for that.
{% endhint %}
To let Customers see an Event but block them from signing up, use the [FOMO feature](https://docs.podplay.app/events/sign-up-for-an-event#fomo-feature).
### Add a Customer to an Event
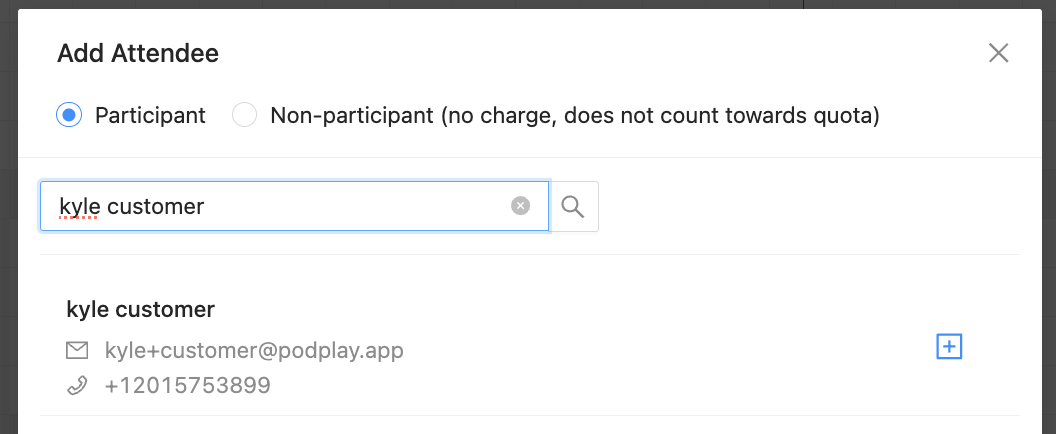
When adding a Customer from the Dashboard, there are two options:
* **Participant** — The customer is charged the set amount (based upon Member vs. Non-member pricing) for the Event, and the customer is counted toward the total number of participants
* **Non-participant** — The customer is not charged anything for joining the Event, whether they are a Member or Non-member, and the customer is NOT counted toward the total number of participants
When the **Participant** option is selected, the checkout window appears and provides further options for how to charge the Customer for their admission in the Event.
* **Card** — Depending on the Customer's card on file, this will say Visa, Mastercard, Amex, etc.
* **Cash** — Similar to a [booked Reservation](https://docs.podplay.app/reservations/admin-creates-a-reservation/book-a-reservation-on-behalf-of-a-customer-for-free) in `Cash`, money movement between the Customer and the Club is tracked for record-keeping purposes only; the system cannot verify with money movement outside the system (useful for cash, checks, or outside payments that the Club wants to track)
* [**Card Terminal**](https://docs.podplay.app/payments/credit-card-terminals) — If your Club has a terminal onsite, it can be used to charge the Customer at the front desk
* **Free** — The Customer is not charged anything for their sign-up and they count toward the total participant count
### Guests on an Event
When a Customer signs up and includes a Guest, both spots are deducted from the Event's total capacity. After signing up, the Customer can send an invitation to their Guest through the Reservations tab of the App — the same flow as [inviting friends to a Reservation](https://help.podplay.app/en/articles/831489). Once the Guest accepts, both Profiles appear in the Attendee list.
If a Customer wants to remove their Guest but keep their own spot, they must cancel their full participation and sign up again without a Guest. If an active Cancellation Policy would charge them for canceling, an Admin can help by removing the Customer (which removes the Guest too) and re-adding only the Customer.
### Edit Guests on an Event
Staff in the Dashboard can now edit the guests for a Customer who signs up for an Event. If an Event allows for Guests to be added during booking, staff in the Dashboard can add or change the Guests within the Attendee list, as long as the Event is not sold out. Event Guest Passes and Credits, if available, auto-apply.
### Add a Customer after an Event has ended
If a Customer attended but was never signed up, you can add them retroactively:
1. Click into the Event
2. Scroll to the Attendees section
3. Click **Add Participant**
4. Select **Guest** (no charge, does not count toward quota) — Regular Participant is not available for past Events
5. Search for the Customer's name
6. Click the **+** button next to their name
7. Click the blue **Add Participant** button
8. Click **Save**
To also charge them for attending:
1. Click the **Purchases** tab
2. Click **Charge**
3. Select the Customer's name
4. Click **Add Item** → **Booking**, enter the cost and description
5. Click **Add**, then **Create Charge**
### Payment Issue on Sign-up
If a Customer has signed up for and secured a spot at an Event, they will be marked as a participant for that Event. If there is an issue during sign-up, the Customer will receive an error message about their credit card (cc) and will be asked to update their cc information. Once the Customer has updated their cc information, they can attempt to sign up again and secure their participation in the Event.
If there is an issue after sign-up, an Admin will see a tag labeled Charge Failed in the Event’s Purchase tab.
If an Admin notices this, please note that the Customer is also aware the signup failed, as the Customer is provided an error message in the front of the App.
Normally, a Customer will update their cc on file and try again, so the Purchase tab of the Event will look like a Customer had a Charge Failed, then Confirmed (or Settling in x-time if the Event has yet to finish).
If the Customer has a Canceled tag next to their name, the Customer signed up for the Event and then canceled their participation in the Event. That spot be free for another Customer to join the Event.
### Generate a link for an Event
Admins can generate links to share Events directly with specific Customers, without requiring them to search the App. From inside any Reservation or Event, click the three vertical dots in the bottom left of the side panel. The available options depend on the Event's status:
**Draft Event:**
* **Generate guest link** (not as participant) — Customer joins but does not count toward attendee quota
* **Generate signup link** — Customer joins normally
* **Preview draft** — lets the Admin view the Event from the Customer's perspective before publishing
**Published Event:**
* **Generate guest link** (not as participant)
* **Generate signup link**
* **Open in web app** — view the live public-facing Event page
---
# Agent Instructions
This documentation is published with GitBook. GitBook is the documentation platform designed so that both humans and AI agents can read, navigate, and reason over technical content effectively. Learn more at gitbook.com.
## Querying This Documentation
If you need additional information that is not directly available in this page, you can query the documentation by asking a question.
Perform an HTTP GET request on the following URL with the `ask` and `goal` query parameters:
```
GET https://docs.podplay.app/events/sign-up-for-an-event.md?ask=&goal=
```
`ask` is the immediate question: it should be specific, self-contained, and written in natural language.
`goal` is what the user is ultimately trying to achieve, the reason they need the answer. Sharing it helps GitBook give you a better, more relevant answer. A goal is most helpful when it describes the outcome the user wants rather than restating the question. For example, with `ask=how do I create an API token`, a goal like `automate deployments from our CI pipeline` lets GitBook tailor the answer to that use case.
The response will contain a direct answer to the question and relevant excerpts and sources from the documentation.
Use this mechanism when the answer is not explicitly present in the current page, you need clarification or additional context, or you want to retrieve related documentation sections.