> For the complete documentation index, see [llms.txt](https://docs.podplay.app/llms.txt). Markdown versions of documentation pages are available by appending `.md` to page URLs; this page is available as [Markdown](https://docs.podplay.app/payments/virtual-credits.md).
# Virtual Credits
### Overview
Credits are a 1-for-1 dollar value inside a Customer's Profile, like store credit at a retailer. Credits display with a dollar sign next to your business name. If your business name is Sports Center, the Credits feature could be edited (in the Company Settings page) to appear as $SC, like $Sports Credits. A Customer can view their Credits inside the More tab in the App.
#### Why a Customer has Credits
* A [Refund](https://podplay.gitbook.io/docs/payments/refunds) was provided
* A [Gift Card](https://podplay.gitbook.io/docs/payments/square-gift-cards) was purchased, by them or for them by another Customer
### Using Credits for a Reservation
Credits are applied the same way a Promo Code is. To use Credits for a Reservation, the Customer will:
1. Click the desired time and day for the Reservation
2. Click the "Check out →" button at the bottom of the page
3. Note the amount of Credits shown at the top of the page
4. Note the Credits are automatically applied to the booking cost
5. Click the "Reserve →" button at the bottom of the page
#### Reservation Invitee
If another Customer is invited to a Reservation, the invitee, too, can apply Credits if any are available in their Profile.
### Using Credits for an Event
To use Credits for an Event, the Customer will:
1. Click the desired Event
2. Click the "Sign up" button for the Event
3. Click the "Check out →" button at the bottom of the page
4. Note the amount of Credits shown at the top of the page
5. Note the Credits are automatically applied to the signup cost
6. Click the "Submit payment →" button at the bottom of the page If Credits are not applied automatically, click the "Apply Credits" button. It applies as many Credits as the Customer has attached to their Profile.
{% hint style="success" %}
"Virtual Credits" can be renamed in your environment to "Credits" or another naming convention.
{% endhint %}
### Using Credits from the Dashboard
Just as Credits are automatically applied when a Customer books from the App, they are automatically applied when an Admin books on behalf of a Customer. An Admin can use a Customer's available Credits when booking a Reservation or adding the Customer to an Event from the Dashboard, and can add or charge Credits directly from the Customer's Profile.
#### Booking a Reservation for a Customer
To book a Reservation for a Customer from the Dashboard, the Admin will:
1. Click, drag, and highlight a court in an open space
2. Type the Customer's name in the Booking Owner section
3. Click the "Go to checkout" button in the bottom right of the side panel
4. Choose the "Card" option so the Customer pays for their Reservation
5. Note any Credits in the Customer's Profile are automatically applied
6. Click the "Book" button in the bottom right of the pop-up window
#### Signing a Customer up for an Event
To sign a Customer up for an Event from the Dashboard, the Admin will:
1. Open the specific Event
2. Click the "Add" button in the Attendees section of the Overview tab
3. Type the Customer's name in the "Search customers" box
4. Check the "+" box next to the Customer's name
5. Click the "Go to checkout" button in the bottom right of the pop-up window
6. Note any Credits are automatically applied
7. Click the "Add Attendee" button in the bottom right of the pop-up window
#### Adding or Charging a Customer's Credits
To add Credits to a Customer's Profile (or charge Credits to reduce the balance), the Admin will:
1. Navigate to the Customer page of the Dashboard
2. Search for the Customer's name
3. Open the Customer's Profile
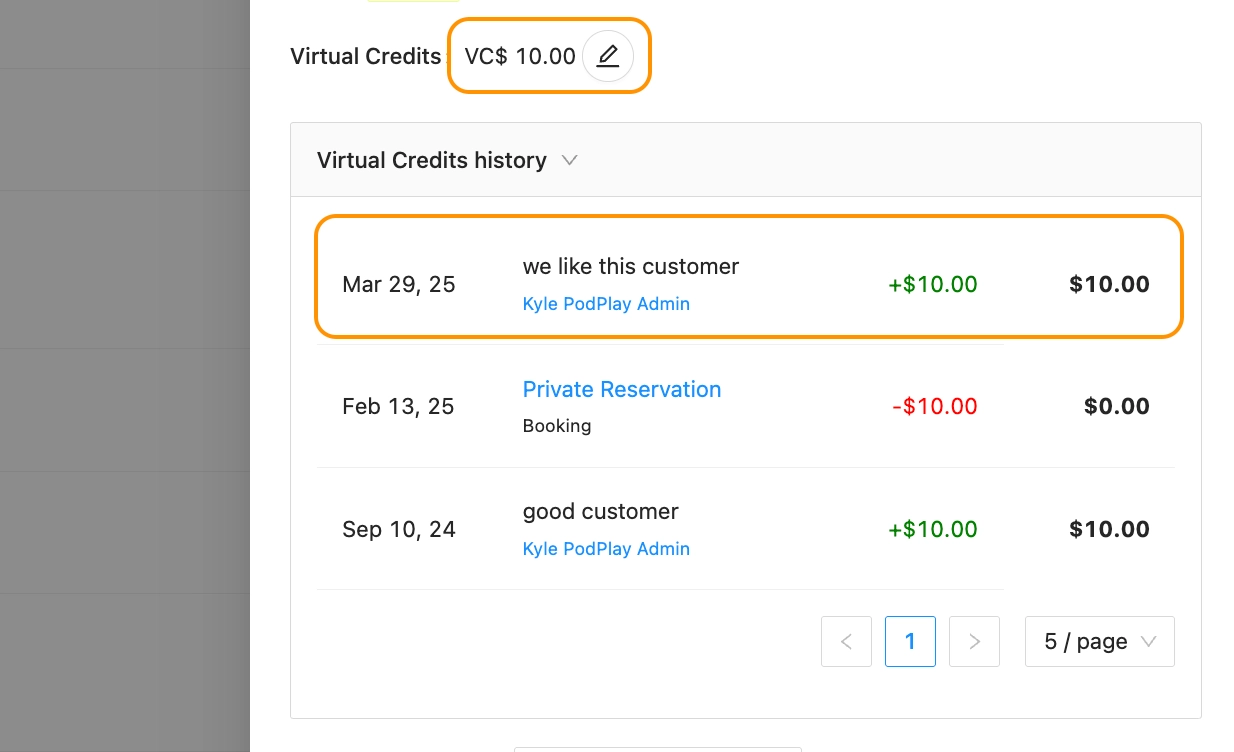
4. Click the pencil icon next to the Credit section
1. Notice the Credit history drawer, where you can review all additions and subtractions of Credits to this Customer's Profile
5. Add (or Charge) for a specific value of Credits
1. Notice the “Add” button can be clicked on and the Customer can be “Charged” for Credits if needed, thereby reducing the Credit quantity
6. Type in a reason for Adding (or Charging) the Customer for Credits
7. Type a reason for Adding or Charging the Credits
8. Click the blue Add button
The Customer now has Credits to use for Reservation bookings and Event signups. The Credit history drawer can be reopened to review all previous Additions and Charges on the Profile.
### FAQs
Can Credits be moved from one Customer to another?
No. The PodPlay system does not allow moving Credits from one Customer's Profile to another. Credits CAN be subtracted from one Profile and added to another Profile, though this is not a "transfer" of Credits. If the Customer requesting the move is in good standing with the Club, it is up to the Club to decide how to support that Customer within the bounds of the system, based upon the Club's SOPs.
Can Credits and Promo Codes be used together?
Yes, and the process will depend on the [Promo Code](https://podplay.gitbook.io/docs/payments/promo-codes) being valuable or more Credits being available to the Customer. Meaning, in an instance where the Promo Code is 50% off, and the Customer has enough Credits to cover the whole cost, the best process for the Customer is to use the Promo Code, then apply the Credits to the balance.
When are Credits subtracted from a Customer's Profile?
Immediately. When a Customer uses Credits, they are subtracted from the Profile right away. This differs from paying with a credit card, where the (default) system places a hold on the card instead of charging it immediately.
Can Credits be used for Replays?
No. Credits can be used to book a Reservation, participate in an Event, and Customers can use their Credits when charged for products from [the Shop page](https://podplay.gitbook.io/docs/payments/the-shop-page) of the Dashboard. There are [Replay Credits](https://podplay.gitbook.io/docs/replays/overview-of-replays/capturing-and-reviewing-replays#replay-credits), a separate feature in the system, which can be used for [Quick Replays](https://podplay.gitbook.io/docs/replays/overview-of-replays/capturing-and-reviewing-replays).
---
# Agent Instructions
This documentation is published with GitBook. GitBook is the documentation platform designed so that both humans and AI agents can read, navigate, and reason over technical content effectively. Learn more at gitbook.com.
## Querying This Documentation
If you need additional information that is not directly available in this page, you can query the documentation by asking a question.
Perform an HTTP GET request on the following URL with the `ask` and `goal` query parameters:
```
GET https://docs.podplay.app/payments/virtual-credits.md?ask=&goal=
```
`ask` is the immediate question: it should be specific, self-contained, and written in natural language.
`goal` is what the user is ultimately trying to achieve, the reason they need the answer. Sharing it helps GitBook give you a better, more relevant answer. A goal is most helpful when it describes the outcome the user wants rather than restating the question. For example, with `ask=how do I create an API token`, a goal like `automate deployments from our CI pipeline` lets GitBook tailor the answer to that use case.
The response will contain a direct answer to the question and relevant excerpts and sources from the documentation.
Use this mechanism when the answer is not explicitly present in the current page, you need clarification or additional context, or you want to retrieve related documentation sections.